Sunday, October 28, 2012

Slow Lightroom down with USB


On my Lightroom wish-list, I always had an item about the CPU usage: I often run "heavy" processor-intensive tasks, and I use a laptop, which is definitely not optimized for heat dissipation.
So I don't care if the task takes 2 or 8 hours, as I'm going to run it overnight anyway... Instead, I care it does not keep the CPU at 100% all the time, because I don't want the computer to melt, and I don't want the fans to run at full speed during the night.
The typical scenario is an export task, but I seem to have found a reasonable workaround: export to a USB device.
Lightroom probably waits for an image to be successfully written before converting the next; a slow USB device seems to give the processor enough "waiting time" to avoid overheating.
I have to admit that in the long run, it tends to be less effective, but I think that connecting the USB to a network device might help even more.

Monday, October 15, 2012

Wi-Fi enabled SD cards

I have an eye-fi card, the classic X2 model (8GB, class 6). I bought it when very few people knew about it, and it roughly works as advertised.
Which means: fine, if you shoot jpeg; slowly, if you upload large images to the camera.

However the biggest problem for me is what is not advertised, namely that you need both an internet connection and a special software just to access the card settings.
If you want the card to connect to a new wi-fi network, you need to log-in into their utility software, enter network name and password, which are uploaded to a server, from which (I think) it downloads a new "mini firmware update" on the fly.
So you need to do this in advance, unless you carry with you some wi-fi hotspot (a macbook is fine: macs can create a wi-fi network), not to mention, the potential security problem: there may be a database full of network credentials somewhere...

Today, I noticed that there's an alternative technology, a card that has an http server included: clients can connect, browse thumbnails and download pictures.

http://www.toshiba-components.com/FlashAir/index.html

Monday, August 13, 2012

Lightroom local controls

An interesting discussion on the Adobe Forum suggested that we don't know enough about how local and global controls interact in Lightroom.


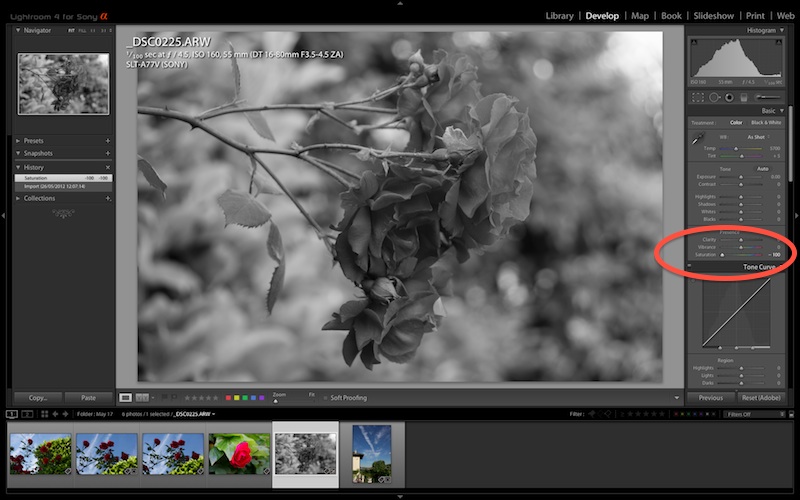
Here I take an image (above) and apply global saturation -100


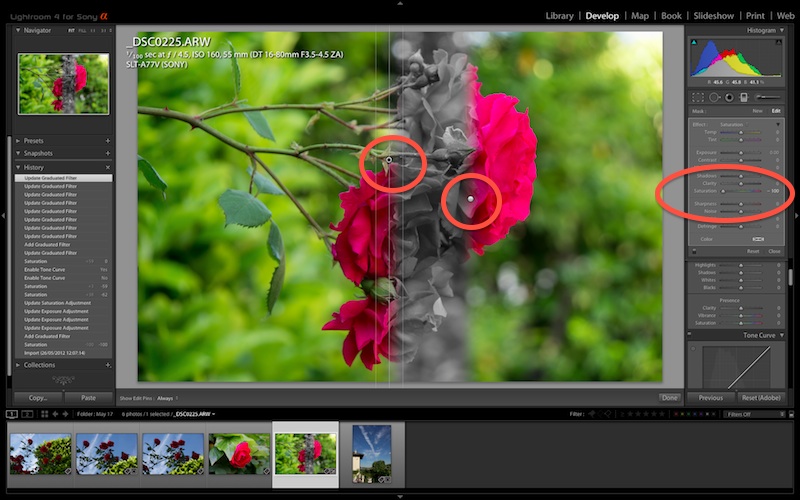
Now I'm going to add a graduated filter with saturation -100. Obviously it does nothing to the image, as it's completely desaturated:


Less intuitive is that when local saturation is boosted to +100, the net effect is not saturation 0 (which would make the picture half colored). It seems that the global effect is applied last, and in a different stage:


Local adjustements, instead, will sum nicely (given that they do not exceed a reasonable parameter range). So here +100-100 = 0. If you overlap more adjustments, then the +100 are eventually going to overflow, so there's no guarantee that the final result will be nicely predictable:


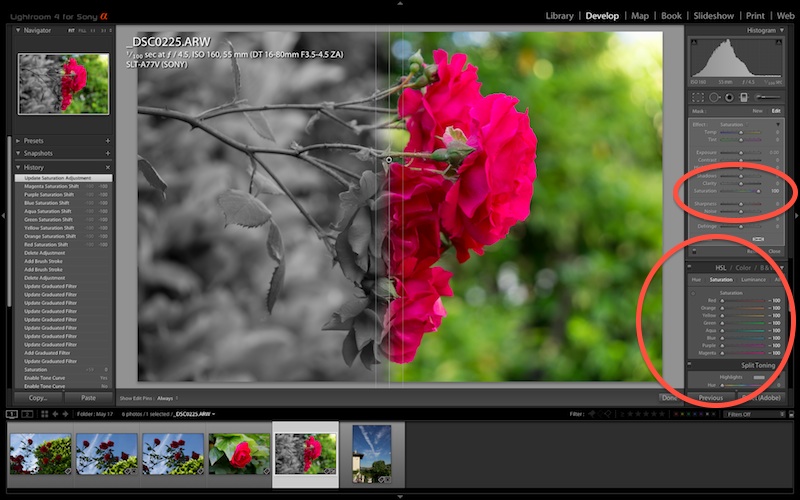
As it was pointed out on the thread, local saturation is additive with color saturation. So we can bring all colors down to -100 and restore them locally with a graduated filter/adjustment brush:


Now the inverse experiment: graduated filter with saturation -100. 
Moving slightly global saturation from 0 to +100, you can see that the saturation affects the grey part of the image. (you would need an animation to see it, but it's really evident if you try; anyway in the grey part of the first image here, there's more white).


But the issue is even more complex.
As pointed out in this book, for example, some sliders will apply a different algorithm for different ranges of parameters (e.g. positive and negative clarity). So if the total value of the parameter is not "consolidated" between the various sliders, there's no guarantee of what the final effect will be.

Tuesday, July 31, 2012

Saturday, July 21, 2012

Blackbird, live forever!


A couple of weeks ago I found a baby blackbird (I think) who fell off the nest. I couldn't take him with me, and the bird didn't survive, but I had my A100 and I took some pictures of him.
I'm posting one here, so he will live forever in Google servers.

Friday, July 20, 2012

P mode = Pro mode

I was reading an article on dpreview about a Sony NEX, and I found this interesting sentence:


From the SLT-A57 there's the 'By Pixel Super Resolution' intelligent interpolation, with the 'Clear Image Zoom' it brings. 

So, they implemented in the firmware of this new NEX, some features borrowed from the A57; given that Sony didn't implement these in the flagship A77, I started wondering why. Probably because customers of the A77 look for a professional camera, and so they don't care about consumer-grade features.
But is this a correct reasoning?

Let's forget for a second that the definition of "professional camera" is somewhat fuzzy (I remember someone said that the only difference between a pro and a standard camera is the number of buttons on the body).
However I do use cameras which can be easily mista... ehm... defined "professional", but 90% of the time the camera is in P mode. Modern cameras are smart enough to take the picture semi-right in fully automatic mode; by "semi-right" I mean a picture which can be adjusted in 10 seconds of postprocessing from Lightroom, without any nasty side effects.
Even if it took 10 seconds to change settings, press buttons, levers, switches... on the camera itself ("look, ma! a professional photographer is changing setting to take a super-professional picture!"), usually I don't have that many seconds, I have to be quick, so P mode + a 0.5-second review of the basic settings in the viewfinder is generally fine.

Having a professional camera does not mean that you have to use it "professionally" all the time. So it would be nice if products were incremental: I would like an A77 that does everything that an A57 does, and something more.